How To Reheat Chilaquiles - Keep Them Great
Chilaquiles, that amazing dish of fried tortilla pieces simmered in salsa, often topped with cheese, cream, and sometimes an egg, can be a real treat. It is, you know, a wonderful breakfast or brunch item, full of comforting tastes and satisfying textures. Yet, like many truly delicious things, sometimes you find yourself with a little bit left over, and then the question comes up: how do you bring that goodness back for another round without it becoming a mushy disappointment?
That day-old chilaquiles situation can feel a little tricky, can't it? The crispness that was there just yesterday seems to vanish, and what was once a vibrant, hearty plate can, well, turn into something less exciting. Nobody wants that, actually, especially when you remember how good it was fresh from the kitchen. We want those corn tortilla pieces to still have some snap, and the sauce to still be full of zest.
But don't you worry, because bringing your chilaquiles back to life, making them taste almost as good as they did at first, is totally possible. It just takes a little know-how, a few simple tricks, and, in some respects, the right tools for the job. We're going to talk about how to make sure your warmed-up chilaquiles are something you genuinely look forward to eating again, perhaps even for lunch the very next day.
- Joseph Coutlis
- Alycia Jasmin Debnam Carey Nude
- Cougar Circle
- Grace Charis Free Nudes
- Precio Del Block En Rep%C3%A3%C2%BAblica Dominicana 2024
Table of Contents
- Why do chilaquiles get soggy, and how to reheat chilaquiles the right way?
- What's the best way to warm up your chilaquiles for a perfect crunch?
- Using your oven to reheat chilaquiles for the best results
- Making your air fryer work its magic when you reheat chilaquiles
- Are there other good ways to reheat chilaquiles?
- How can you keep your chilaquiles tasting fresh?
Why do chilaquiles get soggy, and how to reheat chilaquiles the right way?
You know, it's a common question, why do those lovely tortilla pieces in chilaquiles go from having a nice bite to being a bit soft and sad the next day? Well, it's mostly about the sauce, really. The tortilla chips, or totopos, are like little sponges. When they sit in that wonderful salsa for a while, they just soak it all up. This is, in a way, what makes chilaquiles so comforting and delicious at first, but it's also what changes their feel over time. The sauce, with all its moisture, slowly works its way into the fried corn pieces, making them lose their original firmness. So, when you're thinking about how to reheat chilaquiles, you're also thinking about how to bring back some of that pleasing crispness without drying everything out.
Understanding the texture changes when you reheat chilaquiles
When you first make chilaquiles, the tortilla pieces have a distinct crunch, right? They're often just briefly warmed in the sauce, so they keep some of their fried quality. But as they sit, the liquid from the salsa, whether it's a zesty green one or a rich red one, starts to soften them up. This isn't necessarily a bad thing for some people; some folks actually prefer their chilaquiles a little softer, almost like a savory porridge. However, if you're someone who likes that delightful contrast between soft sauce-soaked bits and still-firm pieces, then warming them up again needs a bit of thought. The goal when you reheat chilaquiles is to apply heat in a way that encourages some of that moisture to leave the tortilla, allowing it to firm up a little, while not making the whole dish dry or too hard. It's a delicate balance, you see.
What's the best way to warm up your chilaquiles for a perfect crunch?
Getting that lovely crunch back into your chilaquiles is, honestly, the main challenge when you're warming them up again. It's almost like trying to bring back a memory of how good they were. The trick often comes down to how you apply the heat. You want warmth that gets into the food but also allows some air to circulate around those tortilla pieces, helping to evaporate some of the extra moisture they've picked up. This is where certain kitchen tools really shine. For instance, the oven or an air fryer can do a really good job here because they surround the food with warm air, which is quite effective for making things a bit more crisp. So, let's explore how you can make your chilaquiles sing again, getting that satisfying texture back in place.
- Martinez Anna
- Jason Wilson Chef
- Rebekah Photography
- Joselyn Cano Sextape
- Money Leis For Graduation Near Me
Using your oven to reheat chilaquiles for the best results
The oven is, in fact, a really good choice for bringing chilaquiles back to life, especially if you have a larger portion. It warms everything through gently and evenly, which helps a lot with texture. To start, you'll want to get your oven ready, setting it to a moderate warmth, perhaps around 325 to 375 degrees Fahrenheit, which is about 165 to 190 degrees Celsius. This range allows the food to warm up without burning the edges or drying out the sauce too quickly. You'll want to spread your chilaquiles out in a single layer on a baking sheet. Using a non-stick sheet or one lined with parchment paper can make cleanup easier, and it also helps prevent sticking. Just a little bit of space between the pieces helps the warm air move around, encouraging that desired crispness to return. You might want to cover the dish loosely with aluminum foil for the first part of the warming process to keep the sauce from drying out too fast, then take it off for the last few minutes to help those tortilla pieces get a bit more firm. This method, honestly, tends to honor the dish's original character quite well when you reheat chilaquiles.
When you're warming them up this way, you're looking for the chilaquiles to be heated all the way through, feeling warm to the touch, and for the cheese, if you added any, to be nicely melted and bubbly. This could take anywhere from ten to twenty minutes, depending on how much you're warming and how cold it was to begin with. Just keep an eye on it, checking every so often. If you notice the edges of the tortilla pieces starting to get a little too dark, you can always put the foil back on. This patient approach really helps in making sure your chilaquiles are not just warm, but truly enjoyable again. It's about transforming what might be just edible leftovers into something that's truly delightful, you know, a dish you're happy to eat again. So, in some respects, it's worth the little bit of extra time.
Making your air fryer work its magic when you reheat chilaquiles
If you have an air fryer, you're in luck, because it's truly a fantastic tool for bringing back that pleasing crunch to your chilaquiles. The way an air fryer works, circulating hot air all around the food, is just perfect for making things crisp again. It's almost like a mini convection oven, but much faster. To use it for your chilaquiles, you'll want to get the air fryer basket ready, maybe giving it a quick spray with a little cooking oil to keep things from sticking. Then, spread your chilaquiles in a single layer in the basket. Don't overcrowd it, because that stops the air from moving freely, and you won't get that good crisping action. You might need to warm them up in a couple of batches if you have a lot. Set your air fryer to about 350 degrees Fahrenheit, which is around 175 degrees Celsius.
The warming time in an air fryer is usually pretty short, perhaps just five to eight minutes. You'll want to check on them after about three or four minutes, giving the basket a gentle shake to move the chilaquiles around. This helps ensure even warming and browning. You're looking for those tortilla pieces to start getting a little bit firm again, and for the entire dish to be heated through. The air fryer’s circulating warmth really helps maintain the pleasing feel of the tortilla pieces, making it a popular choice for many. It's incredibly efficient for a quick refresh, and honestly, it can make a big difference in how much you enjoy your warmed-up chilaquiles. So, for a fast way to get that texture back when you reheat chilaquiles, the air fryer is definitely worth considering.
Are there other good ways to reheat chilaquiles?
While the oven and air fryer are often the top choices for bringing back that desirable texture, they aren't the only ways to warm up your chilaquiles. Sometimes you just need a quick fix, or maybe you don't have those particular kitchen items handy. The good news is that you can still get your chilaquiles warm and ready to eat using other common methods. It might not give you quite the same level of crispness, but it will certainly make them enjoyable. The key is still to warm them through gently, trying to avoid making them even soggier or, on the other hand, drying them out completely. So, let's look at a couple of other practical options for when you want to reheat chilaquiles.
Warming up chilaquiles on the stovetop
The stovetop can be a good option for warming up chilaquiles, especially if you want to add a little something extra to them, like a fresh egg, or if you just have a small portion. You'll want to use a non-stick pan, or one that's got a good surface to keep things from sticking. Put your chilaquiles in the pan over a medium-low heat. The idea here is to warm them slowly, giving the tortilla pieces a chance to firm up a bit on the bottom. You might want to add just a tiny splash of water or a little more salsa if the dish seems a bit dry, just to help create some steam and keep things from getting too stiff. Cover the pan with a lid, which helps trap the warmth and steam, making sure the chilaquiles warm all the way through. This is, in a way, a very hands-on method.
Let them warm for about five to ten minutes, stirring gently every now and then. You're looking for the chilaquiles to be warm throughout and for any cheese to be melted. If you want a bit more crispness, you can take the lid off for the last minute or two and let some of the moisture evaporate. This method is pretty good for getting them warm and enjoyable, even if it doesn't always bring back that perfect initial crunch. It's a quick and practical approach when you need to reheat chilaquiles without much fuss, and it's certainly a reliable way to get them ready for eating again. Just be sure to keep an eye on them so they don't stick or burn on the bottom of the pan.
Quick methods to reheat chilaquiles in a pinch
Sometimes, you just need your chilaquiles warm, and you need them warm right now. For those moments, the microwave is, admittedly, the fastest option. It won't give you any crispness back, actually, and might even make them a bit softer, but it will certainly warm them up. To use the microwave, place your chilaquiles in a microwave-safe dish. You might want to add a tiny bit of water or extra salsa, just a spoonful, to help create some steam and keep the dish from drying out too much. Cover the dish loosely with a microwave-safe lid or some plastic wrap, leaving a small gap for steam to get out. This helps the food warm more evenly and keeps the moisture in. So, it's pretty simple.
Warm them up in short bursts, perhaps 30 to 60 seconds at a time, stirring after each interval. This helps distribute the warmth and prevents hot spots. You'll keep doing this until the chilaquiles are heated all the way through. While this method is quick, it's generally best for when you're not too worried about the texture and just want a warm meal. It's not ideal for bringing back that satisfying crunch, but it's incredibly practical when you're in a hurry. So, if you're looking for speed when you reheat chilaquiles, and you're okay with a softer texture, the microwave is definitely your go-to for a very quick warm-up.
How can you keep your chilaquiles tasting fresh?
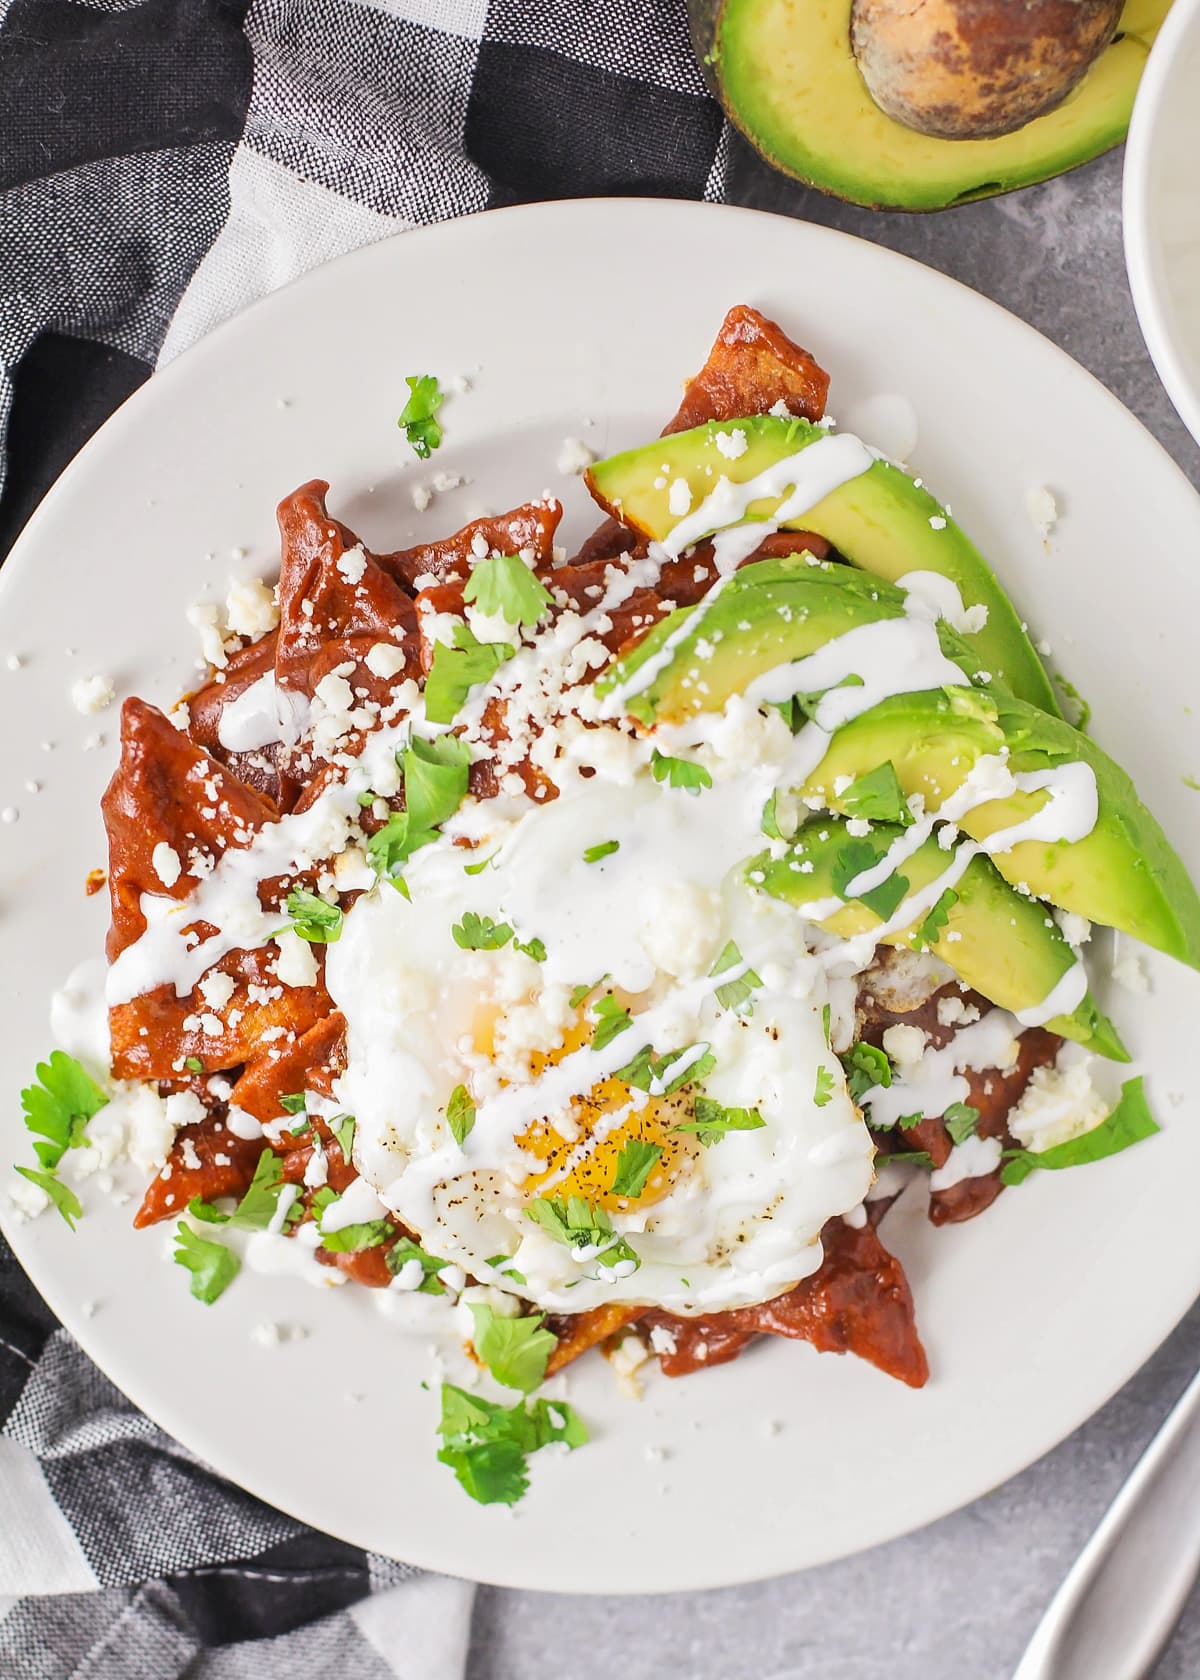
Making your chilaquiles taste as fresh as possible, even after warming them up again, involves more than just the warming method itself. It's also about what you add to them when you serve them. Think about all the wonderful toppings that usually go on chilaquiles when they're first made: a sprinkle of fresh cheese, a dollop of cooling cream or sour cream, maybe some thinly sliced onion, or even a fried egg on top. These fresh additions don't just add flavor; they also bring back a sense of vibrancy and newness to the dish. They help balance out any changes in texture from the warming process and make the whole experience feel less like you're eating leftovers and more like you're having a freshly prepared meal. So, in a way, the toppings are just as important as the warming method itself.
Tips for serving after you reheat chilaquiles
Once your chilaquiles are nicely warmed up, that's when you can really make them shine again. Think about what makes fresh chilaquiles so appealing. It's often the contrast of textures and temperatures. So, even if your warmed-up tortilla pieces aren't as crisp as they were initially, you can add things that bring that feeling back. A generous sprinkle of crumbled cotija cheese or some fresh queso fresco can add a lovely salty bite. A spoonful of Mexican crema or a bit of sour cream can provide a cool, tangy contrast to the warm, savory sauce. You might also consider adding some freshly chopped cilantro, a few slices of red onion, or even some pickled jalapeños for a little kick. These additions aren't just for looks; they really do make a difference in how the dish tastes and feels. They bring a fresh element that counters any staleness.
And, of course, a perfectly fried egg on top is, honestly, a classic addition that makes warmed-up chilaquiles feel like a brand-new breakfast. The runny yolk, in particular, mixes with the sauce and tortilla pieces, adding richness and moisture. If you didn't have avocado with your first serving, a few slices of fresh, creamy avocado can also be a wonderful touch. It's all about layering those fresh tastes and textures on top of the warmed chilaquiles to make them feel special again. So, remember that while getting the warmth right is important, the fresh additions are what truly elevate the experience of enjoying your chilaquiles the second time around. It's about bringing back that joy you felt when you first had them, making your warmed-up chilaquiles something you really look forward to.
How to Make Chilaquiles | Lil' Luna
Video: Chilaquiles - Dish Works

Chilaquiles - Chuck's Fresh Markets
